The Accounting Overview page is a specialized feature accessible exclusively to administrators, with the option to grant specific permissions to designated accounting officers. This page provides a detailed view of all banking accounts linked to investment deals, allowing users to review transaction histories and track updates of incoming and outgoing funds.
From the Accounting Overview, authorized accounting officers can manage and update these accounts as needed, ensuring accurate financial oversight. This documentation outlines the key features of the Accounting module and provides step-by-step instructions on how to effectively use the tool for managing financial transactions within the platform.
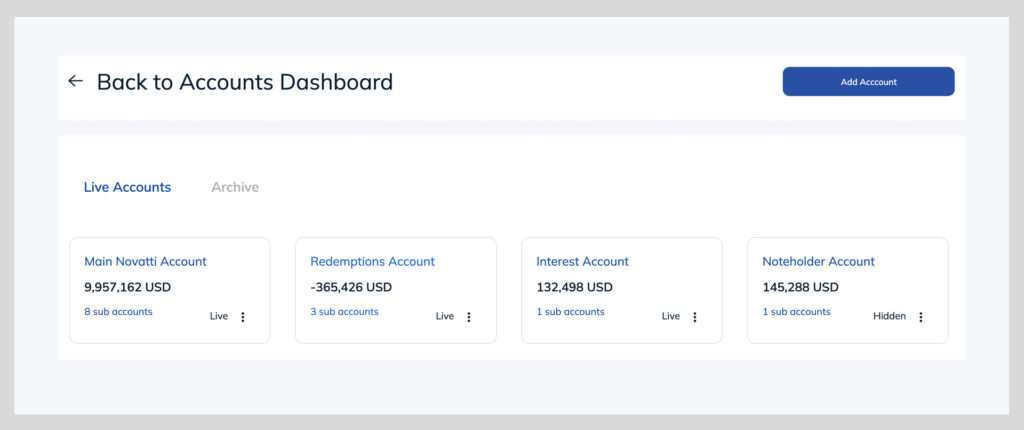
How to check transaction summary for accounts #
- Login to your InvestorDisplay account (admin or accounting profiles)
- Navigate to the “Accounts” menu & select “Accounting Overview”
- Select one of the main accounts that appear
- Select one of the sub-accounts that appear
- Check “Latest Transactions” section below
- Use the drop down filter to search and filter for specific transactions
- Use the export function, to export the list of transactions

How to edit accounts & sub-accounts #
- Login to your InvestorDisplay account (admin or accounting profiles)
- Navigate to the “Accounts” menu & select “Accounting Overview
- Click the “settings” icon at the top right
- Select any of the accounts shown
- Edit account details
- “Account Name” – This is the main account name that will be displayed throughout the platform
- “Status” – You can select the status to open/archived/hidden. Archived would mean the account is closed and is no longer accepting funds. Hidden would mean the account would not show on the overview page.
- “Issuer Company” – This is the name of the company who owns the bank account
- “Banking Fee” – This is a percentage fee that can be added in the case there are 3rd party paying agents managing the account and should be paid a commission for the transaction.
- “Disbursement Validator” – This would be the responsible user who will process the Disbursement Notice when funds have arrived into that account
- “Disbursement Controller” – This is the responsible user who will update and enter in the exact amounts & paid dates once the Disbursement Notice’s have been fully processed.
- “Disbursement Notice Docusign User” – This is the assigned DocuSign account to which the Disbursement Notice will be sent from.
- “Disbursement Notice PDF” – This is the Disbursement Notice PDF Form that gets sent via DocuSign when each Disbursement Notice has been processed

Document Signing Settings:
The document signing settings are the signers who will be involved in the Disbursement Notice process. When each Disbursement Notice gets processed, a DocuSign will be sent to the assigned users with payment disbursement instructions in order to finalize and process the payment. When all parties have signed the document, the payment will be considered as “Transacted”

Accounts in this Group:
This section allows you to edit and update the settings for all sub-accounts within the group. Sub accounts are used to associate different currencies that can be accepted within the main account.

How to transfer funds from an account #
The transfer function provides flexibility in updating the accounting module to ensure that it accurately reflects the true balance of the associated bank account. This feature includes basic transfer options such as deposit, withdrawal, and fund transfers, allowing for seamless management of account balances.
Additionally, users can generate a manual disbursement notice based on account reserves. For more detailed information on the Disbursement Notice process, please refer to the following link (link).
Deposit #
- Navigate to “Accounts” then “Transfer” on the main navigation
- Select the account & sub-account you want to deposit funds to
- Enter in the deposit date
- Enter in the Amount to deposit
- Currency field is fixed dependent on the sub-account currency selected
- Add any notes to easily reference or identify the transaction with
- Click “Update Balance”
Withdraw #
- Navigate to “Accounts” then “Transfer” on the main navigation
- Select the account & sub-account you want to withdraw funds from
- Navigate to the “Withdraw” tab
- Enter in the withdraw date
- Enter in the Amount to withdraw
- Currency field is fixed dependent on the sub-account currency selected
- Add any notes to easily reference or identify the transaction with
- Click “Update Balance”
Transfer Funds #
This feature allows you to transfer funds from one account to another
- Navigate to “Accounts” then “Transfer” on the main navigation
- Select the account & sub-account you want to transfer funds from
- Navigate to the “Transfer Funds” tab
- Enter in the transfer date
- Enter in the total transferrable amount
- Currency field is fixed dependent on the sub-account currency selected
- Select the bank account you want to transfer to
- Enter in the amount to which the receiving account will receive (a manual conversion may need to be applied if the receiving account is in a different currency)
- Add any notes to easily reference or identify the transaction with
- Click “Update Balance”
Manual Disbursement Notice #
The manual disbursement notice feature can be used to generate a new disbursement notice from the reserved funds within the account. When a manual disbursement notice is generated, it will automatically be sent to the assigned disbursements validator to process & initiate payments.
- Navigate to “Accounts” then “Transfer” on the main navigation
- Select the account & sub-account you want to transfer funds from
- Navigate to the “Disbursement Notice” tab
- Enter in the amount to be used for the disbursement notice
- Currency field is fixed dependent on the sub-account currency selected